- In the Project Browser, under Floor Plans, double-click Site.
- Click Massing & Site tab
Modify Site panel
Property Line.
- In the Create Property Line dialog, select Create by sketching.
You use the sketch option because the DWG already contains property line information. The table option can also be used, depending on the information available to users at the time they create the property lines in a project. For more information about the table method, refer to Autodesk Revit Architecture 2010 Help.
- Click Create Property Line Sketch tab
Draw panel
(Pick Lines).
Using the pick lines method, you can use existing geometry in the project as the basis for the property lines.
- On the View Control Bar, click Model Graphics Style
Wireframe.
You change to the Wireframe style to view the right property line. It is hidden by the 3D toposurface in the Hidden Line style.
- Select the 4 property lines, as shown.
- Right line.
- Click Create Property Line Sketch tab
Property Line panel
Finish Property Line.
Tag property lines
- Click Annotate tab
Tag panel
Tag by Category.
- On the Options Bar, clear Leader.
- Select the midpoint of the north property line.
There are no tags loaded for Property Line Segments in this project.
- In the dialog, click Yes to load a property line tag family for use in this project.
- In the left pane of the Open dialog, click Training Files, and open Imperial\Families\Property Line Tag.rfa.
- Click to tag each of the 4 property lines.
- Press Esc.
The property line tag is very small. Change the view scale to make the tags easier to read.
- On the View Control Bar, for Scale, select 1'' = 40'-0''. NoteProject North and True North can be manipulated in the project for proper bearing information. Refer to Autodesk Revit Architecture 2010 Help for more information.Close the file with or without saving it.
Sunday, December 20, 2009
Creating a Site: Adding Property Lines
Creating a Site: Creating a Toposurface
Import contour data to create a toposurface:
- Click Insert tab, then Import panel, then Import CAD.
- In the Import CAD Formats dialog:
- In the left pane, click Training Files, and select Common\Site Plan.dwg.
- For Colors, select Preserve.
- Verify that the Current view only option located on the left side of the dialog is cleared.NoteIf you select the Current view only option when importing the DWG, then the drawing is added as a drafting item and is view-specific. You cannot use a drafting item to create a toposurface.
- Click Open.
The drawing must be moved to the right to ensure that the building is modeled close to the origin of the project. The elevation markers in the project template point to the origin. It is critical that you create Revit Architecture projects as close to this origin as possible.
- Click Check None.
- Select C-TOPO-MAJR.
- Select C-TOPO-MINR.
- Click OK.
The DWG site plan contains information in addition to the contour lines. Use the Add Points from Selected Layers dialog to filter out the lines you do not want to use in creating the toposurface.
14. Click Create Topography Surface tab, then Surface panel, then Finish Surface.
Turn off the visibility of the DWG
- In the Project Browser, expand 3D Views, right-click {3D}, and click Properties.
- In the Instance Properties dialog, for Visibility/Graphics Overrides, click Edit.
- On the Imported Categories tab of the Visibility/Graphic Overrides for 3D View: {3D} dialog, under Visibility, clear Site Plan.dwg, and click OK.
- In the Instance Properties dialog, under Extents, select Section Box, and click OK.
The DWG no longer displays, and a section box is drawn to the extents of the toposurface geometry.
Create a sectioned edge
- In the drawing area, select the section box.
- Drag the controls to adjust the edges of the section box to cut the toposurface with the box. (Exact placement of the edge is not important.)
When the section box edge cuts the toposurface, a cut pattern is displayed on the edge of the toposurface, making it easier to see the topography.
- Right-click the section box, and click Hide in View, then Elements.
- On the View Control Bar, click Model Graphics Style, then Shading with Edges.
- On the navigation bar, click the Full Navigation Wheel, and use the Orbit tool to spin the toposurface to view it at various angles.
Friday, December 18, 2009
Creating a Site: Overview
Creating a Site: Overview
In this lesson, you use site tools to add and modify site components within a project. You learn to:
- Import site contour data and convert it to a 3D toposurface.
- Create and tag property lines, using information from an imported DWG file.
- Add a subregion to the area to define access roads and a parking area.
- Add a building pad.
- Add parking and planting components.
Topics in this section
- Creating a Toposurface
- Adding Property Lines
- Creating a Topographic Subregion
- Adding a Building Pad
- Adding Parking Spaces
- Adding Planting Components
Modifying Project Browser Organization
12/18/09 1:45-2:00pm
In a typical project, you often produce multiple packages of related drawings. These drawings and sheets can become so numerous that navigating a lengthy Project Browser list can be cumbersome. To organize the views and sheets into sets of deliverables, you can use the Project Browser settings to instantly modify how the Project Browser groups and sorts.
In this exercise, you modify the Project Browser organization and create methods of grouping and sorting the views and sheets.
Organize the Project Browser by views
- In the Project Browser, expand Views (all), expand Floor Plans, and expand 3D Views.
- In the Project Browser, expand Sheets (all).
Notice that the sheets are listed alphanumerically based on the sheet number.
- Open each of the 3D views in the following order, and notice the progression of each view:
- Main Bldg - Phase 1-Structure
- East Wing - Phase 2-Structure
- West Wing - Phase 3-Structure
- Completed Project-Structure
- Completed Structure w/ Roof&Floors
- Completed Project
- Click View tab, then Windows panel, then User Interface drop-down, then Browser Organization.
- On the Views tab of the Browser Organization dialog, select Discipline, and click OK.
In the Project Browser, notice that Views are divided into Architectural and Structural disciplines. - In the Project Browser, expand both the Architectural and Structural views.
- On the Windows panel, click User Interface drop-down, then Browser Organization.
- Select Phase, and click Apply.
In the Project Browser, notice that views are grouped by phase. - In the Browser Organization dialog, select Type/Discipline, and click OK.
- In the Project Browser, expand each view type, and notice that each is grouped by discipline.
Specifying Units of Measurement, Temporary Dimensions, and Detail Level Options
- Click Manage tab
Project Settings panel
Project Units.
- In the Project Units dialog, for Length, click the default value.
- In the Format dialog, for Rounding, select To the nearest 1/16", and click OK.
- In the Project Units dialog, for Area, click the default value.
- In the Format dialog:
- For Rounding, select 0 decimal places.
- For Unit symbol, select SF.
- Click OK.
Modifications to area rounding are displayed in schedules and area tags.
- Click OK.
Specify temporary dimension properties
- Click Manage tab
Project Settings panel
Settings drop-down
Temporary Dimensions.
- Under Walls, select Faces.
- Under Doors and Windows, select Openings, and click OK.
In this project, temporary dimensions now snap to the wall faces and to the door and window openings. The location of temporary witness lines can be changed by clicking their controls.
Specify detail levels
- On the Project Settings panel, click Settings drop-down
Detail Level.
When you create a new view and specify its view scale, the detail level is specified automatically according to the arrangement in the table.
TipYou can override the detail level at any time by specifying the Detail Level parameter in the View Properties dialog or the Detail Level icon on the View Control Bar.In this table, you use the arrows between the columns to move view scales from one detail level to another. You do not select a view scale to move it. The view scale moves either from the bottom or the top of the column based on the direction.
- Between the columns Coarse and Medium, click
.
Notice the 1/4" = 1’ 0" view scale moved to the Medium column. Any new view created using this scale is automatically assigned the detail level Medium.
- Click OK.
Tuesday, December 15, 2009
Modifying Line Patterns and Styles/Controlling Object Styles
Modifying Line Patterns and Styles/Controlling Object Styles
| |
|
In this exercise, you create a line pattern and apply it to the fascia of the roof in a sample project. You then create a line style to mark the zoning setback from the property line.
- In the Project Browser, under 3D Views, double-click {3D}.
- Click Manage tab, then Project Settings panel, then Settings drop-down, then Line Patterns.
- In the Line Patterns dialog, click New.
- In the Line Pattern Properties dialog, for Name, enter Roof Line.
- Enter the Types and Values shown in the following illustration:
- Click OK twice.
Now that you have created a line pattern, you can apply it using either of the following methods:
- Use Visibility/Graphics settings to modify the roof appearance in a specific view.
- Use object styles to apply the change to all views.
- On the View Control Bar, click Model Graphics Style, then Hidden Line.
- On the Project Settings panel, click Settings drop-down, then Object Styles.
- In the Object Styles dialog, under Category, select Roofs.
- For Line Color, select Red.
- For Line Pattern, select Roof Line.
- Click OK.
The line style is applied to the roof in the view.
NoteObject Styles for the project can be modified. For example, Projection and Cut Line Weight values can be modified to match office standards. - In the Project Browser, under 3D Views, double-click to Building.
- On the View Control Bar, click Model Graphics Style, and verify that Hidden Line is selected.
Notice that the line color displays in this view, but not the line pattern.
Note: The line pattern is most appropriate in plan views. The pattern is not applied in a perspective or camera view where you expect to see a solid line. Plans, sections, elevations, and orthogonal 3D views show line color and pattern.
- In the Project Browser, under Floor Plans, double-click 03 Roof.
- Click Manage tab, then Project Settings panel, then Settings drop-down, then Object Styles.
- In the Object Styles dialog, under Category, select Roofs.
- For Line Color, select Black.
- For Line Pattern, select Solid.
- Click OK.
- Click View tab, then Graphics panel, then Visibility/Graphics.
- On the Model Categories tab, for Visibility, select Roofs.
- For Projection/Surface Lines, click Override.
This setting overrides the appearance of the roof only in the current view.
- In the Line Graphics dialog, specify the following options:
- For Weight, select 5.
- For Color, select Blue.
- For Pattern, select Roof Line.
- Click OK twice.
Notice that only the appearance of the projection line of the roof is changed. You did not specify a graphic override for the cut lines, so they remain unchanged.
Create a line style
- In the Project Browser, under Floor Plans, double-click Site.
- Click Manage tab, then Project Settings panel, then Settings drop-down, then Line Styles.
- In the Line Styles dialog, under Modify Subcategories, click New.
- For Name, enter Zoning Setback, and click OK.
- For the Zoning Setback category, specify the following values:
- For Line Weight Projection, select 2.
- For Line Color, select Red.
- For Line Pattern, select Double Dash 5/8" .
- Click OK.
- Click Home tab, then Model panel, then Model Line.
- On the Element panel, in the Type Selector, select Zoning Setback.
- On the Options Bar, For Placement Plane, select Level: 02 Entry Level.
- On the Draw panel, click
(Line).
- Draw lines for the setback approximately as shown: NoteIf you only want the setback to display on the site view, click Annotate tab, then Detail panel, then Detail Line. Detail lines only show in the view where they are created, as if they are placed on an overlay of the view.
- Click Modify.
- On the Quick Access toolbar, click
(3D View).
- Click View tab, then Graphics panel, then Visibility/Graphics.
- On the Model Categories tab, expand Lines, and clear Zoning Setback.
This turns off the visibility of the Zoning Setback lines only in this view.
- Click OK.
- In the Project Browser, under Floor Plans, double-click 02 Entry Level.
- Click View tab, then Graphics panel, then Visibility/Graphics.
- On the Model Categories tab:
- Expand Lines, and clear Zoning Setback.
- Expand Site, and clear Property Lines. NoteIf Site is not selected, select it, and then clear Property Lines.
- Click OK.
- On the Quick Access toolbar, click
(3D View).
Friday, December 11, 2009
Modify Snap Increments
In this exercise, you modify snap settings. Snap settings are system settings that are applied to all projects and not saved within a project file. You can turn snap settings on and off, or use the shortcut keys to force a particular snap method. In this exercise, you modify snap increments, work with snapping turned off, and use shortcut keys to control snapping on an instance basis.
1. Click the "R" button, then New, then Project to open a new Revit Architecture project.
2. In the New Project dialog, under Template file, click Browse.
3. In the left pane of the Choose Template dialog, click Training Files, and openImperial\Templates\RAC_MSS_Tutorial_Default_i.rte.
4. In the New Project dialog, click OK.
5. Click Manage tab, then Project Settings panel, then Settings drop-down, then Snaps.
Notice that you can modify both length and angular snap increments. As you zoom in and out within a view, Revit Architecture uses the largest increment that represents less than 2mm in the drawing area. You can add an increment by entering the value with a semicolon after it.
6. Under Dimension Snaps, click in the Length dimension snap increments box following the value 4’ ; and enter 1 ;.
7. Under Object Snaps, notice the 2-letter acronyms next to each object snap option.
You can use these shortcut keys at any time when working on the design. For example, if you want to snap an object to a wall midpoint, enter SM, and only midpoint snaps are recognized until you commit an action. After you click to place the object at the midpoint, snapping reverts to the system default settings.
8. In the Snaps dialog, click OK.
9. Click Home tab, then Build panel, then Wall drop-down, then Wall.
10. On the Options Bar, clear Chain.
11. Click in the center of the drawing area, and move the cursor to the right.
Notice that the listening dimension snaps at 4’ increments. If it does not, zoom out until it does so.
A listening dimension refers to the dimension that displays while you are drawing. This dimension reacts to the movement of the cursor and numerical keyboard entries.
This is the increment that you added previously.
Notice that when snapping is turned off completely, the listening dimension reflects the exact length of the wall as you move the cursor to the left or right.
This is the snap shortcut key that restricts all snapping to midpoints.
Make sure you also delete the semicolon.
Create A Library
Specify library settings and create a library
This library tab will enable you to create a direct link to folders that contain files that you create. there will be a link on the left side of the open and save dialogs.
1. In the Options dialog under the File Locations tab, click Places.
2. In the Places dialog, notice the list of library names.
The list is dependent on the options that you selected during installation. Each library path points Revit Architecture to a folder of families or training files. You can modify the existing library names and path, and you can create new libraries. An icon for each library displays in the left pane of all Revit Architecture Open, Save, Load, and Import dialogs.
When you are opening, saving, or loading a Revit Architecture file, you can click on the library folder located in the left pane of the dialog. In the following illustration, notice that the libraries display as icons in the left pane of the dialog. You can scroll the left pane to access all of the library icons.
3. In the Places dialog, under Libraries, click the Plus button (Add Value).
4. Click in the Library Name field of the new library, and change the name to My Library.
5. Click in the Library Path field for My Library, and click the icon that displays on the right side of the field.
6. Navigate to C:\My Documents or a folder where you want to create a personal library of Revit Architecture projects, templates, or families, and click Open.
Notice that Revit Architecture navigates directly to the library path. If you work in a large office, you may want to set up an office library on a network path to increase productivity and maintain office standards.
Sunday, November 8, 2009
Revit 2010: View Control Bar

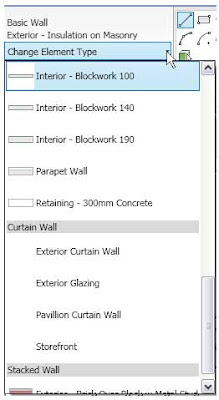
Revit 2010: Type Selector
 To change existing elements to a different type, select one or more elements of the same category. Then use the Type Selector to select the desired type.
Revit 2010: Options Bar
Revit 2010: Status Bar (Hints About What to Do Next)
"If you start a command (such as Rotate) and are not sure what to do next, check the status bar. It often displays tips or hints about what to do next for the current command. In addition, a tool tip appears next to the cursor, displaying the same information.
To cancel or exit the current command, do either of the following:
- Press Esc twice.
- On the Quick Access toolbar, click Modify."
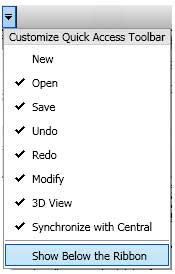
Revit 2010: Using the Quick Access Toolbar
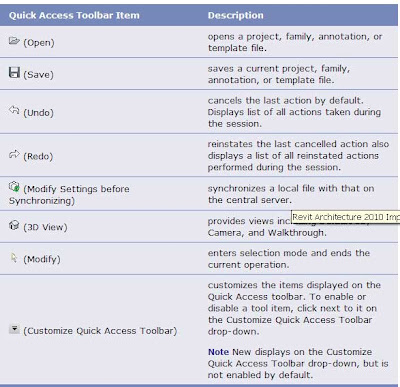
To undo or redo a series of operations, click the drop-down to the right of the Undo and Redo buttons. This displays the command history in a list. Starting with the most recent command, you can select any number of previous commands to include in the Undo or Redo operation.
The Quick Access toolbar can display below the ribbon. Click Show Below the Ribbon on the Customize Quick Access Toolbar to change the display setting.
While in an edit mode (such as Place a Wall), or the Family Editor, items that are added to the Quick Access toolbar from the Create, Modify, Group, Clipboard, or View Graphics panel persist on the toolbar for that mode. However, when you switch to another editing mode, these items do not display and need to be re-added to the Quick Access toolbar.
Saturday, November 7, 2009
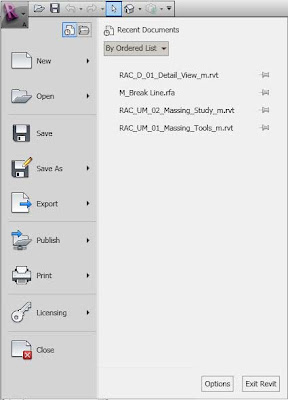
Revit 2010: Access Common Tools
Access common tools to start or publish a file in the application menu.
Click  to quickly perform the following actions:
- Create a file
- Open an existing file
- Save a file
- Export a file to another file format
- Publish a file and place it in a central or shared location
- Print a file
- Access license information
- Close the application
You can quickly access the following dialogs from the application menu:

Revit 2010: The Application Menu
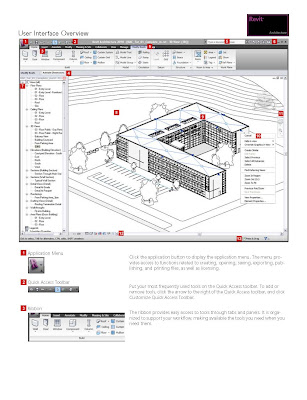
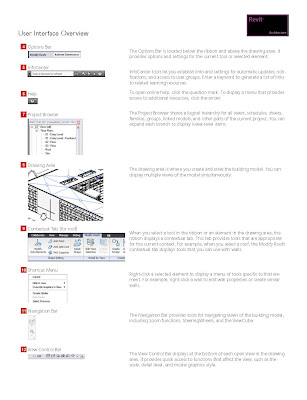
Revit 2010: Application Frame Overview
"The application frame contains tools and provides feedback to help you manage your Revit Architecture projects.
The application frame consists of five main areas described in the following table:
 "
"
Revit 2010: Contextual Ribbon Tabs
For example, when drawing walls, the Place Wall contextual tab displays that has 3 panels:
- Select: contains the Modify command.
- Element: contains Element Properties and the Type Selector.
- Draw: contains the draw editors necessary for creating the wall.
This contextual ribbon tab closes once you end the command.
 "
"
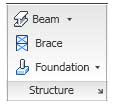
Revit 2010: Ribbon - Expanded Panels
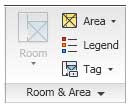
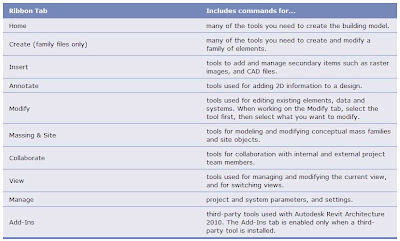
Revit 2010: Ribbon Tabs and Panels

The following table describes the ribbon tabs and the types of commands they contain.
Revit 2010: Ribbon Overview
Revit 2010: Understanding Terms
"Most of the terms used to identify objects in Revit Architecture are common, industry-standard terms familiar to most architects. However, some terms are unique to Revit Architecture. Understanding the following terms is crucial to understanding the software.
Project: In Revit Architecture, the project is the single database of information for your design—the building information model. The project file contains all information for the building design, from geometry to construction data. This information includes components used to design the model, views of the project, and drawings of the design. By using a single project file, Revit Architecture makes it easy for you to alter the design and have changes reflected in all associated areas (plan views, elevation views, section views, schedules, and so forth). Having only one file to track also makes it easier to manage the project.
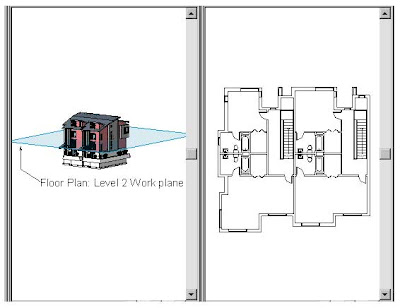
Level: Levels are infinite horizontal planes that act as a reference for level-hosted elements, such as roofs, floors, and ceilings. Most often, you use levels to define a vertical height or story within a building. You create a level for each known story or other needed reference of the building; for example, first floor, top of wall, or bottom of foundation. To place levels, you must be in a section or elevation view.
Level 2 work plane cutting through the 3D view with the corresponding floor plan next to it
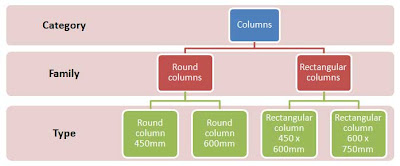
 Element: When creating a project, you add Revit Architecture parametric building elements to the design. Revit Architecture classifies elements by categories, families, and types.
Category: A category is a group of elements that you use to model or document a building design. For example, categories of model elements include walls and beams. Categories of annotation elements include tags and text notes.
Family: Families are classes of elements in a category. A family groups elements with a common set of parameters (properties), identical use, and similar graphical representation. Different elements in a family may have different values for some or all properties, but the set of properties—their names and meaning—is the same. For example, 6-panel colonial doors could be considered one family, although the doors that compose the family come in different sizes and materials.
There are 3 kinds of families:
- Loadable families can be loaded into a project and created from family templates. You can determine the set of properties and the graphical representation of the family.
- System families include walls, dimensions, ceilings, roofs, floors, and levels. They are not available for loading or creating as separate files.
- Revit Architecture predefines the set of properties and the graphical representation of system families.
- You can use the predefined types to generate new types that belong to this family within the project. For example, the behavior of a wall is predefined in the system. However, you can create different types of walls with different compositions.
- System families can be transferred between projects.
- In-place families are custom families that you create in the context of a project. Create an in-place family when your project needs unique geometry that you do not expect to reuse or geometry that must maintain one of more relationships to other project geometry.
- Because in-place families are intended for limited use in a project, each in-place family contains only a single type. You can create multiple in-place families in your projects, and you can place copies of the same in-place family element in your projects. Unlike system and standard component families, you cannot duplicate in-place family types to create multiple types.
Type: Each family can have several types. A type can be a specific size of a family, such as a 30” X 42” title block or a 32" x 84" door. A type can also be a style, such as default aligned or default angular style for dimensions.
Instance: Instances are the actual items (individual elements) that are placed in the project and have specific locations in the building (model instances) or on a drawing sheet (annotation instances).
Revit 2010: Element behavior in a parametric modeler
"In projects, Revit Architecture uses 3 types of elements:
- Model elements represent the actual 3D geometry of the building. They display in relevant views of the model. For example, walls, windows, doors, and roofs are model elements.
- Datum elements help to define project context. For example, grids, levels, and reference planes are datum elements.
- View-specific elements display only in the views in which they are placed. They help to describe or document the model. For example, dimensions, tags, and 2D detail components are view-specific elements.
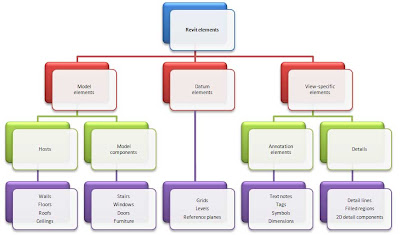
There are 2 types of model elements:
- Hosts (or host elements) are generally built in place at the construction site. For example, walls and roofs are hosts.
- Model components are all the other types of elements in the building model. For example, windows, doors, and cabinets are model components.
There are 2 types of view-specific elements:
- Annotation elements are 2D components that document the model and maintain scale on paper. For example, dimensions, tags, and keynotes are annotation elements.
- Details are 2D items that provide details about the building model in a particular view. Examples include detail lines, filled regions, and 2D detail components.
This implementation provides flexibility for designers. Revit Architecture elements are designed to be created and modified by you directly; programming is not required. If you can draw, you can define new parametric elements in Revit Architecture.
In Revit Architecture, the elements determine their behavior largely from their context in the building. The context is determined by how you draw the component and the constraint relationships that are established with other components. Often, you do nothing to establish these relationships; they are implied by what you do and how you draw. In other cases, you can explicitly control them, by locking a dimension or aligning 2 walls, for example."
Revit 2010: How does it keep things updated?
Revit Architecture uses 2 key concepts that make it especially powerful and easy to use. The first is the capturing of relationships while the designer works. The second is its approach to propagating building changes. The result of these concepts is software that works like you do, without requiring entry of data that is unimportant to your design."
Revit 2010: What is meant by parametric?
The following are examples of these element relationships:
- The outside of a door frame is a fixed dimension on the hinge side from a perpendicular partition. If you move the partition, the door retains this relationship to the partition.
- Windows or pilasters are spaced equally across a given elevation. If the length of the elevation is changed, the relationship of equal spacing is maintained. In this case, the parameter is not a number but a proportional characteristic.
- The edge of a floor or roof is related to the exterior wall such that when the exterior wall is moved, the floor or roof remains connected. In this case, the parameter is one of association or connection."
What is Autodesk Revit Architecture 2010?
In the Revit Architecture model, every drawing sheet, 2D and 3D view, and schedule is a presentation of information from the same underlying building model database. As you work in drawing and schedule views, Revit Architecture collects information about the building project and coordinates this information across all other representations of the project. The Revit Architecture parametric change engine automatically coordinates changes made anywhere—in model views, drawing sheets, schedules, sections, and plans."

